- 0
- 0
- 0
分享
- 通过Epic账户服务(EAS)验证玩家身份
-
原创 2022-04-21

现在,我们已经在Visual Studio 2019中建立起了解决方案的结构,可以开始实现对Epic在线服务的调用了。我们从使用Epic账户服务(EAS)进行身份验证开始。本文将介绍:
身份验证接口与连接接口
在开发者门户中设置EAS
实现身份验证登录
实现身份验证注销
获取代码
身份验证接口与连接接口
人们经常混淆何时使用身份验证接口,何时使用连接接口,因为它们提供的登录功能遵循着相似的模式。然而,它们都有着特定的用途:
身份验证接口处理Epic账户的身份验证。因此,它需要你设置好Epic账户服务。
使用身份验证接口验证身份后,即可访问EOS中的好友、状态和电子商务功能。
身份验证接口使用Epic账户ID。每个Epic账户都对应着唯一的Epic账户ID。
连接接口处理Epic游戏服务的身份验证。它与身份提供商无关,因此可以配合多个身份提供商(如Epic Games、Steam和Xbox Live等)使用。
连接接口不依赖于Epic账户,而是使用产品用户ID(PUID)。组织中的每个特定产品都有唯一的产品用户ID。
分辨这两个接口的最简单方法是,身份验证接口处理Epic账户和相关的社交图谱API,而连接接口处理唯一用户ID。唯一用户ID专为你的游戏而创建,并且必须与外部身份相关联。连接接口使用的ID不属于社交图谱,因此在连接到多个身份的跨平台游玩和跨进度中可以使用这些ID,并且也可以完全不使用身份验证接口。
最后,在某些尚无用户存在的情况下,你可能需要使用其中一种接口。例如,你可以通过Web API在服务器上同时使用身份验证接口和连接接口来验证产品所有权或创建并管理语音聊天室。另一种情况是,在使用EOS之前,如果你不想强迫玩家登录账户,那么你可以使用连接接口的设备ID API创建一个持久伪账户,供玩家立即开始游玩。我们将在后续文章中详细介绍需要使用设备ID的场景。
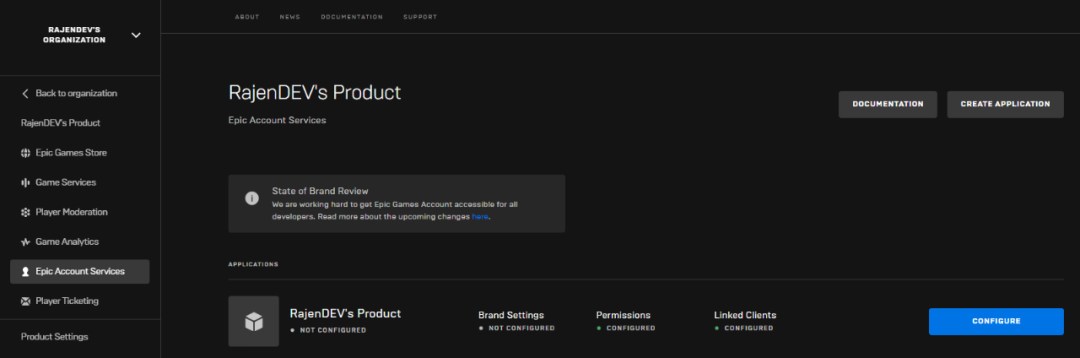
在开发者门户中设置EAS
因为我们希望使用身份验证接口验证用户的身份、获取/设置他们的状态信息,并显示他们的好友,所以在开发者门户中,我们首先必须通过配置应用程序来设置EAS。配置应用程序分为三个部分:品牌设置、权限和链接客户端。我们目前只需要完成后面两个部分,因为只有在Epic Games商城中发布产品时,才需要完成品牌设置。
访问登录开发者门户。
找到你的产品,然后单击左侧菜单中的“Epic账户服务”。阅读条款,如果同意,请接受。
在“Epic账户服务”下,将看到已为你的产品创建了占位符应用程序。单击“配置”按钮来设置它。
我们不会将示例发布到Epic Games商城,所以我们可以跳过“品牌设置”选项卡,单击右上方的“权限”选项卡。
你可以在这里设置应用程序能够向用户请求的权限。现在,我们只启用基本档案权限,稍后在实现相关功能时,我们将启用其他权限。单击“保存”确认。
在“客户端”选项卡中,可以选择要与此应用程序相关联的客户端。在“选择客户端”下拉列表中勾选之前设置的客户端,然后单击“保存”确认。
最后,单击左上角的“返回”按钮回到开发者门户。
实现身份验证登录
由于之前已经构建了MVVM架构,我们现在可以开始实现身份验证登录和注销功能了。
1. 打开ViewModels文件夹中的MainViewModel.cs,并在其中添加以下成员:
private string _accountId;public string AccountId{get { return _accountId; }set { SetProperty(ref _accountId, value); }}private string _displayName;public string DisplayName{get { return _displayName; }set { SetProperty(ref _displayName, value); }}
2. 打开MainWindow.xaml,创建一个简单的UI,以显示身份验证接口返回的AccountId和DisplayName,并创建登录和注销按钮。
<Grid><Grid.RowDefinitions><RowDefinition Height="Auto" /><RowDefinition Height="*" /><RowDefinition Height="Auto" />Grid.RowDefinitions><Grid Grid.Row="0"><Grid.ColumnDefinitions><ColumnDefinition Width="*" /><ColumnDefinition Width="Auto" />Grid.ColumnDefinitions><StackPanel Grid.Column="1"><StackPanel Orientation="Horizontal"><Button Width="100" Height="23" Margin="2" Command="{Binding AuthLogin}" Content="Auth Login" /><Button x:Name="AuthLogoutButton" Width="100" Height="23" Margin="2" Command="{Binding AuthLogout}" Content="Auth Logout" />StackPanel >StackPanel ><StackPanel Grid.Column="0"><StackPanel Orientation="Horizontal"><TextBlock Text="AccountId:"Margin="2" /><TextBox Text="{Binding AccountId}" IsReadOnly="True" Margin="2" />StackPanel ><StackPanel Orientation="Horizontal"><TextBlock Text="DisplayName:"Margin="2" /><TextBox Text="{Binding DisplayName}" IsReadOnly="True" Margin="2" />StackPanel >StackPanel >Grid><TabControl Grid.Row="1" Margin="0,10,0,0">TabControl><Grid Grid.Row="2" Height="18"><Grid.ColumnDefinitions><ColumnDefinition Width="*" /><ColumnDefinition Width="Auto" />Grid.ColumnDefinitions><TextBlock Margin="2,0,0,2" Grid.Column="0" Text="{Binding StatusBarText}" /><ProgressBar Grid.Column="1" Height="18" Width="100" Visibility="{Binding StatusBarText, Converter={StaticResource StringToVisibilityConverter}}" IsIndeterminate="{Binding StatusBarText, Converter={StaticResource StringToBooleanConverter}}" />Grid>Grid>
除了身份验证UI,我们还在底部添加了一个状态栏,用于在进行服务调用时显示信息和进度条,以直观地标示网络活动,因为几乎所有调用都是异步的。进度条使用我们的转换器来控制它的可见性。
在后续文章中,我们将使用TabControl添加游戏服务功能,但现在你的UI应该是这样的:
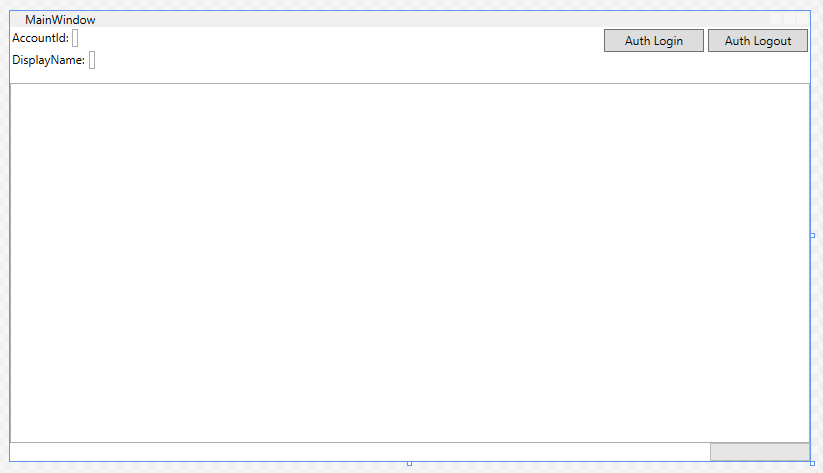
MainWindow身份验证UI
3. 接下来,打开MainWindow.xaml.cs,并在MainWindow()构造函数中添加以下代码行,以设置数据上下文,使XAML绑定按照预期工作:
DataContext = ViewModelLocator.Main;
4. 现在我们需要编辑应用程序设置来实现身份验证功能。打开ApplicationSettings.cs并在其中添加以下成员:
public LoginCredentialType LoginCredentialType { get; private set; } = LoginCredentialType.AccountPortal;public string Id { get; private set; } = "";public string Token { get; private set; } = "";public ExternalCredentialType ExternalCredentialType { get; private set; } = ExternalCredentialType.Epic;public AuthScopeFlags ScopeFlags{get{return AuthScopeFlags.BasicProfile;}}
在示例中,我们将使用AccountPortal LoginCredentialType,它允许我们使用浏览器快速登录。注意,也有其他类型可用于其他用例。 我们还要将身份验证限制为使用Epic账户,但你必须知道,其他ExternalCredentialType值也受支持(如Nintendo、Steam和Discord等)。 最后,我们定义AuthScopeFlags,指示将从用户处访问哪些信息。它应与开发者门户中应用程序的权限设置相对应。
5. 现在,我们要在Initialize()方法中添加以下内容,如此一来,如果这些新成员是通过命令行参数传递的,我们就能正确处理它们:
LoginCredentialType = commandLineArgs.ContainsKey("-logincredentialtype") ?(LoginCredentialType)System.Enum.Parse(typeof(LoginCredentialType), commandLineArgs.GetValueOrDefault("-logincredentialtype")) :LoginCredentialType;Id = commandLineArgs.ContainsKey("-id") ? commandLineArgs.GetValueOrDefault("-id") :Id;Token = commandLineArgs.ContainsKey("-token") ? commandLineArgs.GetValueOrDefault("-token") :Token;ExternalCredentialType = commandLineArgs.ContainsKey("-externalcredentialtype") ?(ExternalCredentialType)System.Enum.Parse(typeof(ExternalCredentialType), commandLineArgs.GetValueOrDefault("-externalcredentialtype")) :ExternalCredentialType;6. 创建一个名为Services的文件夹存放EOS交互逻辑,并添加一个名为AuthService.cs的类:
public static class AuthService{public static void AuthLogin(){ViewModelLocator.Main.StatusBarText = "Getting auth interface...";var authInterface = App.Settings.PlatformInterface.GetAuthInterface();if (authInterface == null){Debug.WriteLine("Failed to get auth interface");ViewModelLocator.Main.StatusBarText = string.Empty;return;}var loginOptions = new LoginOptions(){Credentials = new Credentials(){Type = App.Settings.LoginCredentialType,Id = App.Settings.Id,Token = App.Settings.Token,ExternalType = App.Settings.ExternalCredentialType},ScopeFlags = App.Settings.ScopeFlags};ViewModelLocator.Main.StatusBarText = "Requesting user login...";authInterface.Login(loginOptions, null, (LoginCallbackInfo loginCallbackInfo) =>{Debug.WriteLine($"Auth login {loginCallbackInfo.ResultCode}");if (loginCallbackInfo.ResultCode == Result.Success){ViewModelLocator.Main.StatusBarText = "Auth login successful.";ViewModelLocator.Main.AccountId = loginCallbackInfo.LocalUserId.ToString();var userInfoInterface = App.Settings.PlatformInterface.GetUserInfoInterface();if (userInfoInterface == null){Debug.WriteLine("Failed to get user info interface");return;}var queryUserInfoOptions = new QueryUserInfoOptions(){LocalUserId = loginCallbackInfo.LocalUserId,TargetUserId = loginCallbackInfo.LocalUserId};ViewModelLocator.Main.StatusBarText = "Getting user info...";userInfoInterface.QueryUserInfo(queryUserInfoOptions, null, (QueryUserInfoCallbackInfo queryUserInfoCallbackInfo) =>{Debug.WriteLine($"QueryUserInfo {queryUserInfoCallbackInfo.ResultCode}");if (queryUserInfoCallbackInfo.ResultCode == Result.Success){ViewModelLocator.Main.StatusBarText = "User info retrieved.";var copyUserInfoOptions = new CopyUserInfoOptions(){LocalUserId = queryUserInfoCallbackInfo.LocalUserId,TargetUserId = queryUserInfoCallbackInfo.TargetUserId};var result = userInfoInterface.CopyUserInfo(copyUserInfoOptions, out var userInfoData);Debug.WriteLine($"CopyUserInfo:{result}");if (userInfoData != null){ViewModelLocator.Main.DisplayName = userInfoData.DisplayName;}ViewModelLocator.Main.StatusBarText = string.Empty;ViewModelLocator.RaiseAuthCanExecuteChanged();}});}else if (Common.IsOperationComplete(loginCallbackInfo.ResultCode)){Debug.WriteLine("Login failed:" + loginCallbackInfo.ResultCode);}});}}
这是身份验证登录的核心实现部分,我们来仔细看看:
在整个函数中,我们使用ViewModelLocator.Main.StatusBarText来设置UI中的状态栏文本,当文本不为空时,状态栏将自动显示进度条。
我们使用PlatformInterface.GetAuthInterface()来获得身份验证接口的一个实例,并且在整个函数中,我们都可以使用该实例。
EOS中的所有接口函数都需要实例化一个“options”类,它被传递给服务调用,且通常伴随着一个回调方法事件句柄。例如,我们用ApplicationSettings.cs中的凭证和作用域实例化LoginOptions(),并将其传递给authInterface.Login()。
我们传递一个lambda回调方法给authInterface.Login()来处理登录响应,当定时器更新时,调用MainWindow.xaml.cs中的App.Settings.PlatformInterface?.Tick()将触发该方法。
在回调中,我们检查ResultCode,如果它与Result.Success相等,则登录调用成功。如果两者不相等,则向调试输出中写入一条失败消息和相应的ResultCode。
登录成功时,我们在MainViewModel实例中储存loginCallbackInfo.LocalUserId,这样就可以在应用程序的其他服务调用中使用它。
最后,我们使用PlatformInterface.GetUserInfoInterface()来获取用户信息接口的一个实例,使用该实例,我们就能通过userInfoInterface.QueryUserInfo()来获取其他用户信息(例如他们的DisplayName)。
你会发现,
ViewModelLocator.RaiseAuthCanExecuteChanged();无法解析,我们接下来会解决这一问题。
7. 在项目根目录中创建一个名为Commands的文件夹,并添加一个名为AuthLoginCommand.cs的类。这是MainWindow.xaml中的登录按钮将触发的命令:
public class AuthLoginCommand :CommandBase{public override bool CanExecute(object parameter){return string.IsNullOrWhiteSpace(ViewModelLocator.Main.AccountId);}public override void Execute(object parameter){AuthService.AuthLogin();}}
8. 打开MainViewModel.cs并添加以下成员:
public AuthLoginCommand AuthLogin { get; set; }
9. 另外,在MainViewModel()构造函数中添加以下代码行来实例化命令:
AuthLogin = new AuthLoginCommand();
10. 现在我们打开ViewModelLocator.cs并实现RaiseAuthCanExecuteChanged()函数,确保登录按钮只在用户尚未登录时可用:
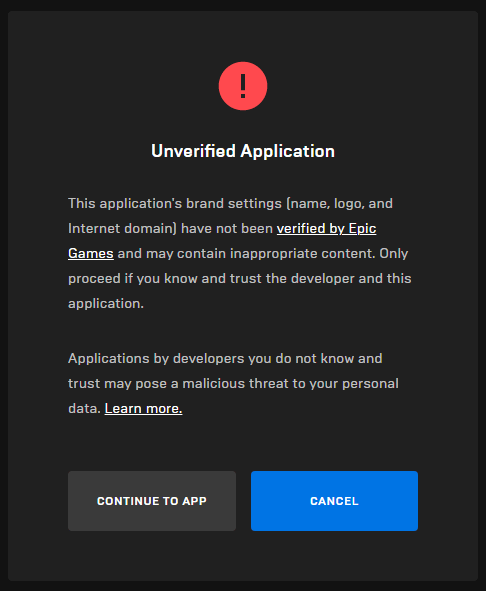
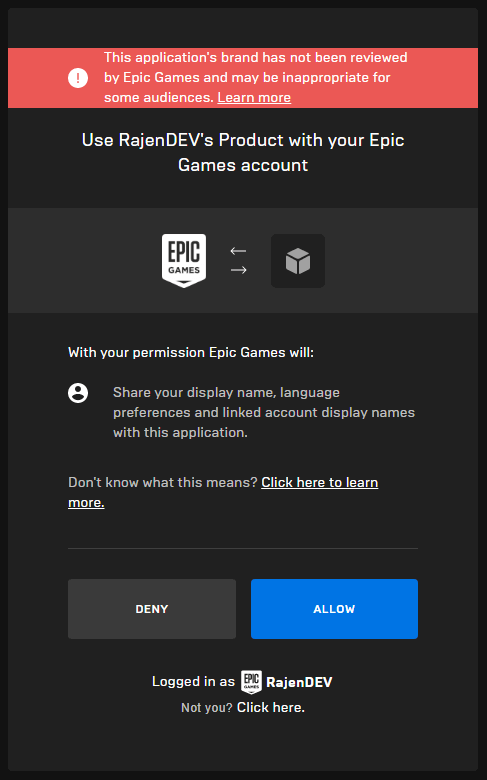
public static void RaiseAuthCanExecuteChanged(){ Main.AuthLogin.RaiseCanExecuteChanged();}现在,你可以运行应用程序并单击“登录”按钮触发浏览器窗口,使用你的Epic账户进行身份验证。由于我们的应用程序只是处于开发阶段,你只能在开发者门户中使用属于自己组织的Epic账户登录。登录后,你会看到一则通知,提醒这是一个未经验证的应用程序,因为我们尚未通过品牌审查。接下来,你会看到用户同意对话框,其中显示了产品请求访问的范围,本例中即基本档案信息。单击“允许”将关闭浏览器并触发回调方法,这会检索DisplayName,并将其显示在应用程序UI中AccountId的旁边。
实现身份验证注销
既然我们已经建立起了结构,实现注销就更简单了:
1. 打开AuthService.cs并添加Logout()方法
public static void AuthLogout(){var logoutOptions = new LogoutOptions(){LocalUserId = EpicAccountId.FromString(ViewModelLocator.Main.AccountId)};App.Settings.PlatformInterface.GetAuthInterface().Logout(logoutOptions, null, (LogoutCallbackInfo logoutCallbackInfo) =>{Debug.WriteLine($"Logout {logoutCallbackInfo.ResultCode}");if (logoutCallbackInfo.ResultCode == Result.Success){ViewModelLocator.Main.StatusBarText = "Logout successful.";var deletePersistentAuthOptions = new DeletePersistentAuthOptions();App.Settings.PlatformInterface.GetAuthInterface().DeletePersistentAuth(deletePersistentAuthOptions, null, (DeletePersistentAuthCallbackInfo deletePersistentAuthCallbackInfo) =>{Debug.WriteLine($"DeletePersistentAuth {logoutCallbackInfo.ResultCode}");if (logoutCallbackInfo.ResultCode == Result.Success){ViewModelLocator.Main.StatusBarText = "Persistent auth deleted.";ViewModelLocator.Main.AccountId = string.Empty;ViewModelLocator.Main.DisplayName = string.Empty;ViewModelLocator.Main.StatusBarText = string.Empty;ViewModelLocator.RaiseAuthCanExecuteChanged();}});}else if (Common.IsOperationComplete(logoutCallbackInfo.ResultCode)){Debug.WriteLine("Logout failed:" + logoutCallbackInfo.ResultCode);}});}
2. 在Commands文件夹中添加名为AuthLogoutCommand.cs的新类:
public class AuthLogoutCommand :CommandBase{public override bool CanExecute(object parameter){return !string.IsNullOrWhiteSpace(ViewModelLocator.Main.AccountId);}public override void Execute(object parameter){AuthService.AuthLogout();}}
3. 在MainViewModel.cs中为新命令添加一个成员和实例化:
public AuthLoginCommand AuthLogin { get; set; }public AuthLogoutCommand AuthLogout { get; set; }public MainViewModel(){AuthLogin = new AuthLoginCommand();AuthLogout = new AuthLogoutCommand();}
4. 最后,在ViewModelLocator.cs中向RaiseAuthCanExecuteChanged()方法添加以下代码行:
Main.AuthLogout.RaiseCanExecuteChanged();
按F5运行应用程序,你将看到,在完成登录流程前,身份验证注销按钮为禁用状态;在登录后,你可以使用它顺利注销。
获取代码
在下方可以获取本文的代码。请严格遵守“在Visual Studio 2019中为EOS设置C#解决方案”一文中设置C#解决方案部分的步骤5和步骤10,将SDK添加到解决方案中,并编辑ApplicationSettings.cs以包含你的SDK凭证。
在下一篇文章中,我们将探讨如何获取并设置玩家的在线状态信息。

-
阅读原文
* 文章为作者独立观点,不代表数艺网立场转载须知
- 本内容由数艺网主动采集收录,信息来源为 “虚幻引擎” 公开网络发布内容。第三方如需转载本内容,必须完整标注原作者信息及 “来源:数艺网”,严禁擅自篡改、删减或未标注来源转载。 并附上本页链接: 若您的内容不希望被数艺网收录,或认为此举侵犯了您的合法权益,敬请通过微信 ID:d-arts-cn 联系数艺网。我们将致以诚挚歉意,并第一时间为您办理下架或删除处理。
-

-
上海
设备厂商 · 虚拟现实制作软件
未认证的机构号
最近发布
-
2023-12-07
-
2023-10-31